
Day notes
Day 1 & 2: Welcome to the Red Sands of the Kalahari
We hope you had a pleasant flight and are ready for the adventure ahead! Your journey begins the moment you touch down at Hosea Kutako International Airport. After completing the necessary formalities, you’ll collect your rental vehicle: a rugged 4x4 pick-up, perfectly suited for the diverse roads of Namibia.
The Trans Kalahari Walk: A Night Under the Stars Once you’ve secured your vehicle, you’ll head south to your first destination: the Kalahari Red Dunes Lodge. You will spend the next two nights here, with unique opportunities to immerse yourselves in the desert landscape:
Trans Kalahari Walk: For those seeking a true connection with nature, there is the option to join a guided trek through the dunes, including an overnight stay in a luxury tented camp in the heart of the Kalahari. It is the ultimate way to experience the profound silence of the desert.
Lodge Relaxation: If you prefer to stay put, the lodge offers excellent facilities. Enjoy a classic 'sundowner' drive as the setting sun turns the dunes an even deeper shade of red, or take a shorter guided walk to learn about the desert's specialized flora and fauna.
Wildlife Encounters: Keep a lookout for springbok, oryx, and the iconic sociable weavers that build massive, communal nests in the camelthorn trees.
Self Drive from Hosea Kutako International Airport [WDH] to Kalahari Red Dunes Lodge
Self Drive
Hosea Kutako International Airport [WDH]
Kalahari Red Dunes Lodge
Stay at Kalahari Red Dunes Lodge
Day notes
Day 3 & 4: The Monumental Dunes of the Namib
Today, you set course for Desert Homestead Lodge, a stunning retreat located just outside Sesriem. You are now at the gateway to the world-renowned Namib-Naukluft National Park, an area famous for its towering apricot-colored sand dunes and the surreal beauty of the Sossusvlei region.
On day 4, one of the absolute highlights of your journey awaits. Accompanied by an experienced guide, you will venture deep into the desert to uncover the secrets of this ancient landscape:
Climbing the Dunes: Challenge yourself by hiking up the famous 'Big Daddy' or 'Dune 45'. The view from the crest, overlooking the endless sea of sand, is simply breathtaking.
Deadvlei: Visit the iconic white clay pan with its ancient, blackened camel thorn trees standing in stark contrast against the deep blue sky and orange dunes. Your guide will share fascinating insights into the unique nature and history of the area.
Sesriem Canyon: Explore the deep natural gorge carved over centuries by the Tsauchab River. It is a wonderfully cool spot to witness the geological forces of Namibia up close.
Self Drive from Kalahari Red Dunes Lodge to Desert Homestead Lodge
Self Drive
Kalahari Red Dunes Lodge
Desert Homestead Lodge
Stay at Desert Homestead Lodge


Day notes
Day 5: Rolling Hills and Namibia’s Best Apple Pie
Today, you can enjoy a relaxed pace. With only a short three-hour drive ahead, there’s no need to rush your morning coffee. Your destination is the Namib’s Valley of a Thousand Hills, a region that lives up to its name with endless vistas of rolling ridges and dramatic landscapes.
No journey through this part of Namibia is complete without stopping at Solitaire. This tiny, iconic desert outpost is the perfect place to refuel both your car and yourselves:
The Famous Apple Pie: Be sure to visit the bakery. The apple pie, made famous by the late 'Moose' McGregor, is legendary and highly recommended.
Desert Relics: The rusting car wrecks partially buried in the sand make this one of the most photogenic spots in the country.
Upon arrival at your accommodation, the afternoon is yours to enjoy. Put on your hiking boots and explore the "Valley of a Thousand Hills." You can choose to wander independently or join a guided walk to discover the hidden details of this ancient geological formation.
Check-out from Desert Homestead Lodge
Self Drive from Desert Homestead Lodge to Solitaire (Fuel)
Self Drive
Desert Homestead Lodge
Solitaire (Fuel)
Self Drive from Solitaire (Fuel) to Namib's Valley of a Thousand Hills
Self Drive
Solitaire (Fuel)
Namib's Valley of a Thousand Hills
Check-in to Namib's Valley of a Thousand Hills

Day notes
Day 6: Heading to the Coast; The Journey to Swakopmund
Today, you’ll leave the Namibian interior behind and head toward the stunning Atlantic coastline. With a road trip of about four hours ahead, feel free to take your time this morning. A final walk through the Valley of a Thousand Hills is a true must-do for anyone wanting to soak in the mountain air one last time.
During the drive, you’ll cross the Tropic of Capricorn, a significant geographical marker on Earth. This line signifies the boundary between the tropics and the temperate zones. It’s a fantastic spot to pull over for a quick photo—a classic memento of your Namibian expedition.
Your destination is the charming Brigadoon Boutique Guesthouse in Swakopmund. This coastal town, nestled between the roaring ocean and towering sand dunes, offers a unique blend of adventure and relaxation. Spend your evening enjoying fresh Atlantic seafood at one of the many excellent restaurants along the pier as you enjoy the cool sea breeze.
Check-out from Namib's Valley of a Thousand Hills
Self Drive from Namib's Valley of a Thousand Hills to Brigadoon Boutique Guesthouse
Self Drive
Namib's Valley of a Thousand Hills
Brigadoon Boutique Guesthouse
Check-in to Brigadoon Boutique Guesthouse

Day notes
Day 7: From the Skeleton Coast to the Granite Giants of Spitzkoppe
Today, you bid farewell to the coast and head back into the rugged Namibian interior. Your day begins with a scenic drive along the shoreline, with a recommended stop in the small fishing town of Henties Bay to stretch your legs or enjoy a quick coffee by the sea.
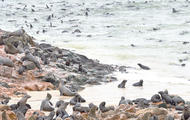
As you continue your journey, you’ll be treated to the desolate and breathtaking vistas of the infamous Skeleton Coast. If you have some extra time, a detour to Cape Cross is highly worthwhile:
The Seal Colony: Witness one of the largest colonies of Cape Fur Seals in the world. It is an overwhelming (and loud!) spectacle of thousands of seals lounging on the rocks and playing in the surf.
Note: This detour adds about 1.5 hours to your total travel time, including a 20-minute stop at the colony.
As you turn inland, the majestic granite peaks of Spitzkoppe, often called the "Matterhorn of Namibia", will appear on the horizon. These ancient rock formations are a photographer's dream. Tonight, you’ll be camping right in the heart of this stunning landscape. Take the time to explore the winding walking trails, discover ancient San rock paintings, and visit the famous 'Rock Arch'. As the sun dips below the horizon, the granite glows a deep, fiery orange, followed by a starlit sky that is among the clearest in the world.
Check-out from Brigadoon Boutique Guesthouse
Self Drive from Brigadoon Boutique Guesthouse to Spitzkoppe Tented Camps & Campsites
Self Drive
Brigadoon Boutique Guesthouse
Spitzkoppe Tented Camps & Campsites
Check-in to Spitzkoppe Tented Camps & Campsites
Day notes
Day 8 & 9: Ohorongo Safari Lodge
Today, you’ll head toward a truly exceptional destination: the Ohorongo Safari Lodge. As the drive takes approximately five hours, we recommend an early start. The best route leads you through the town of Outjo, a perfect spot for a final coffee break or to pick up some small supplies, before entering the vast private reserve through the main gate.
You will spend the next two nights immersed in a landscape dedicated to conservation and tranquility. The undeniable highlight of your stay is a thrilling guided nature walk, where you will track the elusive black rhino on foot.
Tailored Planning: Upon arrival, check in with the lodge manager to finalize the timing of your walk. This ensures you can head out at the optimal time of day for the best sightings and lighting.
The Bush Experience: Beyond the rhino tracking, the reserve is home to a wealth of other wildlife and bird species. Enjoy the profound silence of the lodge and take these two days to truly disconnect and recharge under the vast African sky.
Self Drive from Spitzkoppe Tented Camps & Campsites to Outjo Bakery
Self Drive
Spitzkoppe Tented Camps & Campsites
Outjo Bakery
Self Drive from Outjo Bakery to Ohorongo Safari Lodge
Self Drive
Outjo Bakery
Ohorongo Safari Lodge
Stay at Ohorongo Safari Lodge


Day notes
Day 10: Hobatere Lodge
Today offers you the luxury of choice. You can start your morning at a relaxed pace with a final activity at Ohorongo Safari Lodge, or head out early to get a head start on your journey toward Etosha. After your morning plans, you’ll drive to Hobatere Lodge, the perfect stepping stone before officially entering Etosha National Park tomorrow.
The lodge is situated within a private concession area often referred to as "Little Etosha," and for good reason. Bordering the national park, the wildlife here moves freely across the landscape.
Waterhole Watching: The lodge overlooks a popular waterhole, making it the ideal spot to relax with a drink while watching elephants, giraffes, and eland come down to drink.
Recharge: Take a dip in the pool and soak in the surroundings as you prepare for the coming days of world-class wildlife viewing in the heart of Etosha.
Check-out from Ohorongo Safari Lodge
Self Drive from Ohorongo Safari Lodge to Hobatere Lodge
Self Drive
Ohorongo Safari Lodge
Hobatere Lodge
Check-in to Hobatere Lodge
Day notes
Day 11: Safari through Etosha
The day every nature lover anticipates has arrived: a full day in the world-renowned Etosha National Park. Today is all about wildlife as you explore the vast salt pans and numerous waterholes that make this park so unique. You’ll enter via the Galton Gate in the west, where you’ll settle the park fees before the adventure truly begins.
The western part of Etosha was closed to the general public for a long time, giving it a raw and untouched feel. As you slowly make your way toward the southern section, you’ll encounter various waterholes where elephants, giraffes, zebras, and numerous antelope species gather.
Self-Drive Adventure: There is nothing quite like the thrill of being behind the wheel yourself, scanning the horizon for a pride of lions or a well-hidden leopard.
Guided Safari: If you’d prefer to sit back and let a professional spot the wildlife for you, a guided gamedrive is a fantastic option. Guides often share real-time information about the most active waterholes.
As the sun begins to set, you’ll exit the park through the Andersson Gate to spend the night at the welcoming Toshari Lodge. Nestled under a canopy of Mopane trees, it’s the perfect sanctuary to enjoy a cold drink and recount the day's sightings under the African stars.
Check-out from Hobatere Lodge
Self Drive from Hobatere Lodge to Galton Gate
Self Drive
Hobatere Lodge
Galton Gate
Self Drive from Galton Gate to Toshari Lodge
Self Drive
Galton Gate
Toshari Lodge
Check-in to Toshari Lodge
Day notes
Day 12 & 13: Across the Great White Pan to Onguma Forest Camp
Today, your journey continues eastward as you drive straight through the heart of Etosha National Park. This isn't just a travel day; it's one continuous game drive! As you navigate from waterhole to waterhole, you’ll have plenty of opportunities to spot herds of elephants, lounging lions, or perhaps even a rare black rhino that you may have missed earlier in the trip.
Your destination is the charming Onguma Forest Camp, located within a private nature reserve bordering Etosha. Here, you will spend the next two nights surrounded by the sights and sounds of the bush in an intimate and luxurious setting. As the afternoon sun begins to mellow, a very special activity awaits:
Sundowner Drive: Board an open safari vehicle for a drive through the private reserve. Your guide will take you to a prime spot to witness the legendary Namibian sunset.
Toasting the Bush: As the sky transforms into spectacular shades of orange, purple, and pink, enjoy a refreshing drink and snacks. It’s the ultimate way to end the day and truly soak in the magic of the wilderness.
Self Drive from Toshari Lodge to Onguma Forest Camp
Self Drive
Toshari Lodge
Onguma Forest Camp
Stay at Onguma Forest Camp
Day notes
Day 14: Relaxation and a Final Adventure at Otjiwa Reserve
Your journey concludes with a stay at the charming Otjiwa Safari Lodge, the perfect place to unwind and reflect on the many adventures you’ve experienced. While relaxation is key, there are still plenty of opportunities for exploration. If you’re looking for one last adventure, a visit to the nearby Waterberg Plateau Park is a fantastic option. This park offers spectacular views and another chance to explore Namibia’s unique and rugged landscapes.
Whether you choose to relax at the lodge or embark on a final discovery of the plateau, Otjiwa Safari Lodge provides the ideal setting to bring your journey to a close.
Check-out from Onguma Forest Camp
Self Drive from Onguma Forest Camp to Otjiwa Collection - Eagle's Rest
Self Drive
Onguma Forest Camp
Otjiwa Collection - Eagle's Rest
Check-in to Otjiwa Collection - Eagle's Rest


Day notes
Day 15: Heading home; A suitcase full of memories
All good things must come to an end, and today it’s time to check out from the lodge. You’ll take a relaxed drive back towards Windhoek and continue to Hosea Kutako International Airport. It’s time to say goodbye to your reliable 4x4 and the vast, open landscapes of Namibia. As you prepare for your flight home, you’ll be carrying a wealth of unforgettable memories with you.
On behalf of Jouw Afrika Reis, we wish you a safe journey back and hope this African adventure stays with you for a lifetime!
Check-out from Otjiwa Collection - Eagle's Rest
Self Drive from Otjiwa Collection - Eagle's Rest to Hosea Kutako International Airport [WDH]
Self Drive
Otjiwa Collection - Eagle's Rest
Hosea Kutako International Airport [WDH]


